
Intro
My university tasked me to write about deception (honeypots, honeyusers, honeytokens). I used this as motivation to investigate ways in Active Directory to trick attackers in getting caught by traps (or the other way around: How I as an attacker can circumvent possible traps / honeytokens from the blue team).
Deploying deception techniques is in my opinion really important because most of the time the attacker is in advantage (the attacker just needs to find one vulnerability; the defenders must find and fix all ; the attacker can attack when he wants, the defenders must detect attacks at every time, ...), however, with deception techniques this changes. Now the attacker needs to find all traps and triggering just one is enough for the blue team to detect the hack. That's why more companies should use them.
I also want to thank @InsertScript for his technical input and proof reading.
Agenda
This blog post is pretty long; you can skip sections, especially if you know already basic honeyuser / honeytoken techniques. Most of the stuff is already documented on the internet, however, as far as I know the "Fake deceptive BloodHound paths" chapter describes a new technique to trick attackers. Feel free to skip the other chapters and just read the last one. (Reading the full post takes ~30 minutes, reading just the last chapter takes ~10 minutes).The following attacks (and traps) will be covered:
- Password spraying
- Password in description
- Users with old and weak passwords
- Kerberoastable users
- Honeyports
- Fake service which points to the honeyport
- Detect PowerView usage
- Detect Responder.py / Inveight usage
- Fake deceptive BloodHound paths (this is new)
How to setup a testlab
I used DeceptionLab to create a testlab with a preconfigured Active Directory. After cloning the git repository you can just run the following command and wait 3-4 hours and you have a full testlab ready!
./build.ps1 -ProviderName virtualbox
I recommend to work on the WEF system (to test the attacks described in this post) because Windows server evaluation systems don't reboot as frequent as the workstations (you can work on WEF 1 hour before the system reboots).
I recommend to work on the WEF system (to test the attacks described in this post) because Windows server evaluation systems don't reboot as frequent as the workstations (you can work on WEF 1 hour before the system reboots).
Password spraying
The attack:
In large environments it's a common attack vector to try to perform a login with all user accounts with just one common password . An attacker would do the following steps:
Obtain all usernames:
a. Via the SAMR (SAM remote) protocol,
e.g. with the command:
net user /domain
b. Via the LDAP / LDAPS protocol; e.g.
with the tool PowerView with the command:
Get-NetUser
c. Via WMI (see this blog post for details)
Get-WmiObject
-Class Win32_UserAccount -Filter "Disabled='False'" | Select Name,
Domain, Status, LocalAccount, AccountType, Lockout,
PasswordRequired,PasswordChangeable, Description, SID
Perform
the password spraying:
a. With normal logins
Typically, tools like Invoke-CleverSpray.ps1 are used which check the current number of wrong password attempts before spraying to prevent accounts from a lockout. This has the
advantage that accounts are not locked and that old passwords of accounts can
be detected, but it’s slow and it generates events with the ID 4625 ("An account
failed to log on"). The blue team could look for these events.
b. Via Kerberos preauthentication
Kerberos preauthentication can be
used as it just sends one UDP packet to check credentials which means it’s very
fast and it has the advantage that no 4625-events ("An account failed to
log on") are generated. The tool kerbrute can be used for this.
The following figure shows an example of the attack:
The trap:
One possibility for detection can be the aggregation of invalid login events which triggers an alert as soon as a specific threshold is reached. However, in this blog post I want to focus on honeyusers:
An account can
be created with a dummy password which is often probed during attacks. A very common password is for example "Summer2019!" or in Germany "Sommer2019!". This password must be updated according the current season. The user can be created with the following command (or in the GUI):
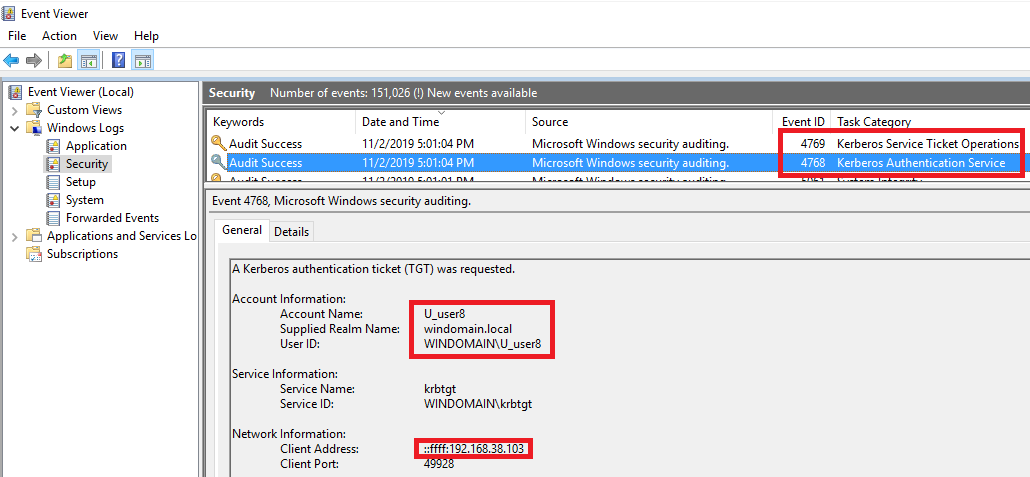
The log monitoring solution can check for 4624 (account logon) and 4634 (account logoff) events for this honey user. I identified as another possibility to use event ID 4768 (Kerberos Authentication Service) or 4769 (Kerberos Service Ticket Operations), but I must also mention that I have limited blue team experience, so maybe looking for additional event IDs should be taken into consideration. For reference, a login created the following event in my network (which is created when the attacker logged in with the identified credentials):
 All the above points are important
when new accounts are created and will therefore not be covered again in the
next chapters (which also require the creation of new users).
All the above points are important
when new accounts are created and will therefore not be covered again in the
next chapters (which also require the creation of new users).
New-ADUser -SamAccountName
"HoneypotUser" -GivenName "HoneypotUser" -Surname
"" -Name "HoneypotUser" -Path
"OU=Users,DC=windomain,DC=local" -AccountPassword
(ConvertTo-SecureString -AsPlainText "Summer2019!" -Force) -Enabled
$true
The log monitoring solution can check for 4624 (account logon) and 4634 (account logoff) events for this honey user. I identified as another possibility to use event ID 4768 (Kerberos Authentication Service) or 4769 (Kerberos Service Ticket Operations), but I must also mention that I have limited blue team experience, so maybe looking for additional event IDs should be taken into consideration. For reference, a login created the following event in my network (which is created when the attacker logged in with the identified credentials):
Keep the following in mind:
- It’s extremely important to not weaken the security of the company with a new user. For example, if the user would be assigned to a VPN or Citrix group this could result in a disaster (this could allow to remotely compromise the company!). On the other side an attacker can easily detect the decoy because the user is not in such a default group.
- The account naming schema should be similar to the company’s typical policy and other fields like full name, given name, home directory and so on should look valid (more on this later).
- The honeyuser script which updates the password (to the new season ; e.g.: from "Winter2018!" to "Summer2019!") should also create random logins. Otherwise the attacker could see that nobody logged into this account since a long time (but updates the password) which could look suspicious.
- A special focus should be put on the “account created” date. A new account can be a hint for an attacker that this account is potentially a honeypot user. However, creating "fake old users" has another problem. If the company was already compromised attackers may know the names of old accounts and can therefore compare their old list of usernames with the new users and see that the honeyuser was not there the first time (but it has an old “account created” field). It’s therefore recommended to create two users, an old user with a faked “account created” field (for new attackers) and a new user with a different password (e.g.: if during a previous attack lots of users used the password “<CompanyName>2017!” the password “<CompanyName2019!>” could be used). One of the next chapters discusses how the “account created” date can be faked.
- An attacker can use the honeyuser to further hide his tracks. It’s therefore important that logs can be used to identify the originating user account of the attacker.
- It should also be ensured that other users in the domain don't use such weak passwords. If the attacker would find 20 accounts with the password “Summer2019!” he would likely not use the decoy user and instead a real user.
Password in description
The attack:
It’s a common first step for attackers to dump all
users together with their description from Active Directory. Lots of
administrators assume that the description field is just visible to
administrators (or just in AD administration tools) and store therefore credentials in it. However, this is wrong and every user can read
the field of every other user in the domain. The following figure shows the
commands to conduct the attack:

The trap:
The SVC_service3 user in the above image is the
decoy. The user was created with the following command:
New-ADUser -SamAccountName "SVC_service3"
-GivenName "Service3" -Surname "" -Name
"SVC_service3" -Description "Password: Reporter#123" -Path
"OU=ServiceAccounts,OU=VIENNA,DC=windomain,DC=local" -AccountPassword
(ConvertTo-SecureString -AsPlainText "Reporter#123" -Force) -Enabled
$true
Again, logon and logoff events can be captured
to detect attacks. Similar to the above explanation the account should have
valid properties (e.g. regularly perform a login) and should not allow remote
attackers to compromise the company (don’t assign Citrix or VPN group
memberships!).
Users with old and weak passwords
The attack:
Another common first step for attackers is to
look for very old accounts which likely have weak passwords. This can be done
with the following commands:

The trap:
The “SVC_oldService” is the decoy service user.
Instead of this name another username can be chosen like “SVC_Siemens”
with a password like “Siemens” (side note: I have nothing against Siemens, it was just the first company which came to my mind). It’s very common for attackers to focus on such
accounts because nobody used strong passwords in 2003.
Faking the “pwdlastset” field in
Active Directory is not a simple task because even domain administrators are
not allowed to write to this field. For example, trying to change it in the GUI on the domain controller results in the following error:

Some years ago faking this value was simply not possible. This
changed with the development of the “DC Shadow” attack which gives attackers
write access to the Active Directory. To perform the DC Shadow attack to
fake the “pwdlastset” field for a newly created honeypot user the following
commands can be used.
At first a cmd must be started as local
administrator. After that the tool mimikatz must be started and the following
commands must be used to become local SYSTEM:
mimikatz
# !+
mimikatz
# !processtoken
After that the following command can
be used:
mimikatz # lsadump::dcshadow
/object:SVC_oldService /attribute:pwdLastSet
/value:"126913363710000000"
This command starts a fake domain
controller which sets the “pwdLasetSet” attribute to 126913363710000000 as soon
as a real domain controller starts to synchronize with the fake one. The
output should look like:

After that a synchronization process
can be started. For this a cmd must be started as domain administrator. This
can be done with the following command (note: the /netonly flag is important):
runas /netonly
/user:windomain.local\domain_administrative_user cmd.exe
After that mimikatz can be
started and the following command can be used to start the synchronization
process:
mimikatz #
lsadump::dcshadow /push
The output should look like:

As soon as this command is started
the synchronization happens in the first cmd, the output should look like:

After that the “pwdlastset” field
was updated to the faked one. The same approach can be used to fake other
attributes for users (and to bypass the validation from the GUI).
Keep the following in mind:
The decoy can easily be detected if other properties of the account are not faked. For example:
However, Vincent Le Toux (who developed DC Shadow together with Benjamin Delpy) mentions in their BueHat Talk on DC Shadow at minute 35:58 that the "whencreated" field can't be modified with DC Shadow. So how can we fake it? A solution could be to use a really old account, create a new account for the old one and switch the accounts and then use the old account as honeypot user (e.g.: modify all attributes and fake the pwdLastSet attribute with DC Shadow). For this the account can be renamed in the GUI of the domain controller (in the aduc tool), just right click the user and select "rename" and give a new name (which will change the cn and therefore also the distinguishedName; the other attributes can be changed in the attribute editor or via DC Shadow). However, I would be very careful with this technique (e.g.: if the account has ACLs configured because of legacy reasons this can create a privilege escalation possibility).
Other things to watch for:
- The HoneypotBuster tool can be used to check if the honeypot user can be detect by attackers. It’s recommended to modify the detected attributes to look legit and until the tool does not find the honeyuser.
- It could make sense to also set the “admincount” field to 1. This indicates that the user was at some time in a privileged group (but could be moved out again; the field would stay set). If an attacker is not checking the “pwdlastset” field but instead focusing on admin accounts (based on the “admincount” field) he could also find the decoy. This does not increase the privileges of the account and is therefore recommended to set. Another interesting configuration could be the "account is sensitive" flag or the "protected users" group (depending on the usage of them in the domain).
- The "password last set" date should not be older than the domain / company. For example, if an attacker can easily google that the company was founded 10 years ago but the password is 16 years old it’s showy. Another indicator can be the “krbtgt” user “pwdlastset” field. This field initially shows the date when the domain was created. With a upgrade to domain functional level 2008 the field was updated. So maybe the pwdlastset field should be set to a similar value to the krbtgt user (however: you should change the krbtgt user password at least all 6 months twice!).
Kerberoastable Users
The attack:
Kerberoasting is a common Kerberos attack. It exploits the fact that authorization checks are performed only in the service and not in service ticket requests. Therefore, any authenticated
user can query service tickets for all services available in the domain (even if
the user is not allowed to use the service). Since Kerberos works with
symmetric encryption the service ticket is partially encrypted with the
password of the service user. This therefore means that an offline bruteforce
attack can be conducted against the ticket. To extract the ticket from memory
initially local administrative privileges were required, however, this is
nowadays no longer required because the ticket-query can be re-implemented.
To start Kerberoasting either the tool PowerView or Ruberus can be used (the following figure uses PowerView):
The hashes.txt file can be copied to an
attacker system with GPUs and cracking can start with the following command:
With the tool NPK (which starts cloud instances
on AWS like 8 Tesla V100 GPUs) a 7 character password can be cracked in four
hours (for 8 Dollar per hour). Cracking 8 characters requires approximately 19
days on this instance, but running the biggest public available wordlists
plus 300 000 modifications rules per word from the list just takes 12
minutes. If the password can be cracked the output would look like:

The trap:
Users become kerberoastable as soon as a SPN
(service principal name) is set (the SPN is a field in the user object in
Active Directory). The specified service (and the hostname on which the service
runs) is not important, the service and host must not exist. It’s therefore
recommended to use a not existing service because this ensures that the
attacker can’t use the service to escalate privileges. This is also commonly
found in companies where an administrator installed for example a test MSSQL
server with his account and later removed the database again. From this point on
the account is kerberoastable (but the service and host is maybe not available anymore).
Note: The service itself should be a common one like MSSQL. A list of service
SPN names can be found at:
To configure a SPN for an existing
user the following command can be used (executed as domain administrator):
setspn -s MSSQLSvc/mars.windomain.local:1433 A_user7
The password of the user must be simple enough to be offline bruteforce-able but hard
enough to look legit. It’s recommended to use one of the not so common passwords
from the rockyou password list. The service could also be used as a decoy,
however, it’s recommended to create another user for a
decoy service (more on this in a
later chapter).
Again, the attack can be detected by looking for logon events for the
kerberoastable user. It must also be mentioned that kerberoasting could be detected by checking service ticket requests which ask for
tickets encrypted with RC4. Per default tickets are nowadays encrypted with AES
and therefore RC4 requests can be used as alert. However, this behavior is (as far as I know?) not
very consistent and disabling RC4 is also not trivial in Windows (correct me if I'm wrong). It’s therefore better to use a decoy user to detect this attack.
The
kerberoasting attack can also be detected by checking the event id 4769 (“a
kerberos service ticket was requested”) because nobody should request a ticket
for this service.Honeyports
The attack:
Typically
attackers run an initial port scan in the network to get an overview of
available services. This can either be done with a full port scan or just for
the most common ports like 21, 22, 80, 443, 445, 1433, 3389, 5985, 5986, 8080,
8081.
The trap:
A port scan
can be detected with scripts like the following:
- https://github.com/securitygeneration/Honeyport (Linux)
- https://github.com/Pwdrkeg/honeyport (Windows)
The script can be started with the following command:

When an attacker starts a scan the
port looks open:

This generates an event per sent
packet:


Note that the attacker IP address is not shown
correctly in the log, the script must therefore be adapted to fix this bug.
Fake Service which points to a honeyport
The attack:
Experienced attackers maybe don't run port
scans because of possible honeyports or IDS systems. Instead Kerberos services can be queried
from Active Directory. This can be done with the following command:
setspn -F -Q */*
The trap:
It makes therefore sense to create a new user
(with a strong password) and set a SPN on this user which points to the HTTP
service running on the honeyport system. An attacker which queries all HTTP and
HTTPS systems from Kerberos with the above command to then starts a script
which screenshots the websites running on these servers (e.g.: by using the
tool eyewitness) can easily be detected because it would trigger the
honeyport. The SPN can be set with the
following command:
setspn -s HTTP/honeyportSystem.windomain.local:80 honeyportUser
Detect PowerView usage
The attack:
PowerView is nowadays one of the
most used Active Directory enumeration scripts. Phineas Phisher (the person who
hacked Hacking Team, FinFisher and the Catalan police) wrote: “The best tool
these days for understanding windows networks is Powerview.” source
It makes therefore sense to detect
the use of PowerView in the network with honeyusers. Typically commands like “Get-DomainUser”
are used to enumerate users.

The above figure (excerpt of the
output) shows that a lot more information is available than displayed by
Microsoft tools like “net user /domain DA_user6”. For example, a normal user
can query the logon count of a domain admin account.
Variations of the PowerView tool
exist, for example goddi (a go implementation of the LDAP enumeration) or ldapsearch
(see this video for
details) which can be executed from Linux. It would be nice to also detect
these tools.
The trap:
To detect the usage of PowerView and similar
tools the fact that these tools query all available information will be
exploited.
Nikhil Mittal describes in his blogpost (this chapter is based on his blog post) that
the function AddAuditAccessObjectAce() can be used to create events when
specific properties of users are read. As property he used X500UniqueIdentifier
because this property is not read by Microsoft tools like “net user” but read
by attacker tools which query all properties. The auditing can be configured
with his Deploy-Deception script.
His blog post is really good and the best resource I found to deploy deception users, I highly recommend to read his post.
The following figure shows how the script can be used to create deception users which detect PowerView usage:

If PowerView is now started as attacker (as user
U_user1 run "Get-NetUser") a long output is shown (including details to all users). The output does not show the
x500uniqueIdentifier because this property is not set on the account, however,
it generates an alert that the attacker read the property:

The event can be found in the
security logs (green box) and a filter for 4662 event IDs was configured (blue
box). The output (red boxes) shows that an enumeration script was started by user U_user1.
Detect Responder.py / Inveight usage
The attack:
A very common attack scenario is to do LLMNR /
NetBios spoofing in Windows networks. If Windows can’t resolve a name using DNS
it has a fallback configured to LLMNR and NetBios.
For example, if an administrator (or
user) enters in Google Chrome in the search bar a search word:

This results in a DNS query which
won’t be resolved and therefore a LLMNR query will be sent. LLMNR queries are
broadcast queries and therefore attackers can respond to these queries. The
result will be that the victim establishes a connection to the attacker:

Another such tool is inveight which
is basically a PowerShell implementation with the same functionality plus the
possibility to create ADIDNS entries (e.g.: a wildcard DNS entry can be created
in Active Directory as unprivileged user).
The trap:
The typical protection is to disable LLMNR and NetBios traffic in the domain and to create a wildcard DNS entry (which then can’t
be overwritten by attackers). However, the real underlying problem is the NTLM
usage which could be disabled in the entire domain. However, this is in many environments not possible yet (e.g.: printers which don’t
support Kerberos).
Since LLMNR / NetBios spoofing is
still a common attack vector a decoy will be created for it. There are a lot of
scripts available to detect responder like Detect-Responder, ResponderGuard and Respounder. Respounder was working out of the box and therefore I used it:
The tool is pretty simple, it can be
started and if it finds a LLMNR / NetBios responder, it creates an alert:


The respounder script can regularly be started on a Linux system using a cronjob. On Linux it also creates a
syslog entry which can be used for detection.
Fake deceptive BloodHound paths
There is a
last step missing for the honeyusers. They are no attractive attack targets
yet. Nowadays attackers typically first run BloodHound and depending on the
output attack specific users (this itself could already already trigger the honeyport
but in this chapter we assume that the attacker executed BloodHound without
detection!). Examples of BloodHound queries are “find shortest path to domain
admins” or “kerberoastable user to domain admins”. That means that for example
users are only attacked via kerberoasting if the user can give the
attacker more privileges. Let's consider the following output
of BloodHound:

The problem:
If we create such a path for the honeyusers we actually give the
attacker a way to escalate his privileges. We just want that it looks like
there is a path but in reality this path is not possible to follow! So how do
we create this deception?
Nikhil Mittal proposed in his blogpost to
make the honeyuser a domain administrator or give the account DCSync rights.
This directly makes the honeyuser an attractive attack target. At the same time
he prevents exploitation by ensuring that a login can’t be performed by setting
either the logon workstation to a non-existing machine or by setting the “deny
logon” flag for the user.
Both solutions sound pretty
dangerous (although Nikhil Mittal is a very experienced active directory
researcher and certainly knows a lot more about AD security than I) and I will therefore not use them because
an attacker can maybe somehow bypass them. Moreover, it’s pretty
obvious to discover the honeypot user because dumping user information with
PowerView or “net user” would reveal that the user can’t login.
In fact, Dirk-jan tested this and identified that the logon workstation can easily be spoofed and the Windows check can easily be bypassed (btw, Dirk-jan has a really cool blog which you should also check):
 Let’s use therefore another solution.
BloodHound supports the pre-build “find shortest paths to domain admins” query
which is used by most attackers. Let's assume the output of this query is the following:
Let’s use therefore another solution.
BloodHound supports the pre-build “find shortest paths to domain admins” query
which is used by most attackers. Let's assume the output of this query is the following:
In fact, Dirk-jan tested this and identified that the logon workstation can easily be spoofed and the Windows check can easily be bypassed (btw, Dirk-jan has a really cool blog which you should also check):

SVC_SIEMENS is an interesting attack target because the user has the permissions to add new members to the domain admins group. An
attacker might think that it is clever to attack SVC_SIEMENS,
however, it isn’t because SVC_SIEMENS is the honeyuser which was created in the
“users with old and weak passwords” chapter and this user can’t add new
domain admins!
Wait, what? This contradicts the above output of BloodHound?
Well, I created two users with the following commands:

Note that two “SVC_SIEMENS” users were created
and note the red marked lines from the second command. The samAccountName of the
second user is “ SVC_Siemens” and not “SVC_Siemens” (it starts with a space).
Similarly, the name ends with a space to also hide it in AD tools. A prefix space
was used in the samaccountname because BloodHound appends the domain in the
output, so a suffix space would be visible.
The user who can add new admins is
the user which starts with a space (but this user has a very strong password)
and attackers are tricked to attack the SVC_Siemens user instead (which
is useless to them).
The space at the end of the “name” can be used to hide in other tools, e.g.: the AD tools output looks like:

It’s not possible to see the
difference of these users in this UI view (side note: Such fake accounts can even be created as
unprivileged default users in active directory! See this awesome blog post for details).
Let’s now go one step further. The
problem is the validation of the samAccountName in the GUI which prevents us
from creating two accounts with exactly the same samAccountName (the same login
name!). In the GUI this is obviously prevented (in the aduc tools on the domain controller):


The output shows that 1 object was successfully
updated. And indeed two users are created which
completely look the same and which have the same login name (this means that
the second user can’t login anymore! At least as far as I know).


I would not recommend to use this technique because a) I have no clue if AD keeps working correctly with multiple users having the same login name and b) the attacker could see that there are two users in the BloodHound UI with the same name. (edit: I really don't recommend to do this in your AD. When I added a new user and opened the attribute editor I saw attributes from users which I deleted three days ago. After closing the editor tab and opening it again I saw the correct attributes; I'm pretty sure that this behavior comes from this attack...).
It would be nice to have a simple way which doesn't require the usage of DC Shadow. Fortunately, we can use Unicode in the samAccountName (supported by the UI of the aduc tool on the domain controller!).
Let's start simple with a Unicode reverse character. You can copy the character from this blog post. Just copy the () and paste it into notepad.exe and start to write between ( and ). You can write for example "snemeiS_CVS", the reverse text of "SVC_Siemens". Because of the reverse character it will be displayed as "SVC_Siemens". Then coyp and paste it into the aduc tool in the attribute editor:

The result in BloodHound:

The problem is that the displayed domain was also reversed (@windomain.local in reverse is lacol.niamondiw). I also tried to include multiple reverse characters (to show the domain again from left to right), however, I didn't manage to find a way to display it correctly.
So let's try another technique. Open in Google Chrome the developer tools and write:
"\u200b"
Then copy and paste the output ("") into notepad.exe. The output should look like:

You now have a "zero width space" between the " symbols in your notepad. You can check this by using the arrow buttons on your keyboard. You will see that your cursor will stop one time when you press right (or left). By holding shift while you press the left or right arrow you can mark the symbol and copy it with ctrl+c. Let's now create the user:
SVC_SXiemens
Replace the X with the "zero width space" and set the samaccountname to this name. The output in Bloodhound:

In my opinion it's completely impossible to identify the fake in the above image. You can identify it by coping the name in the left pane into notepad and by using the left arrow you can see that there is an additional character. You can also try it from my website, here is the fake user with the "zero width space":
SVC_SIEMENS@WINDOMAIN.LOCAL
However, I also can't recommend to use this technique! Why? First of all the first character should be the trick-character. If an attacker uses the search box in BloodHound and enters "SVC_" he should not see two "SVC_Siemens" users. This could be solved by using the "zero width space" character as first character. A bigger problem is the output of "net user /domain":

The green box shows the user which should be attacked by an attacker (which has a weak password) and the red box marks the fake user which can add domain administrators (but which is secured with a very strong password and which creates the deception that SVC_Siemens is a valuable target). However, the attacker can see that something is strange (because cmd.exe shows our "zero width space" as a normal space! Wtf Microsoft?).
Ok, next attempt. Let's consider the character generated with:
"\u212A"
This should generate a character which looks very similar to "K". For testing purpose I created a user named "TestKK" where the first "K" is the fake one and the second one is a normal "K". This looks in notepad like:

In notepad you can see a difference, however, when you configure this samAccountName and dump it with BloodHound it looks like:

Can you see a difference between the "K"s? I guess not. You can just detect this by copying the name again out of the left pane. But we have again a problem in cmd:

I tested some of the characters and the following characters are correctly displayed in the cmd (these are fake characters and not the normal ones! Note: Especially the Greek alphabet is very useful!):
ΑаΒϹСϲΕЕІЈјϳΚΜΝΟοРрЅѕΤТՍΑΒΕΖΗΙΚΜΝΟΡΤΥΧ
I visualized the characters in BloodHound (I printed 6 characters per user; the first 6 characters are the real characters followed by 6 fake characters so that it's possible to search for a character which is very hard to detect). The result:

My favorite characters are:
ΒΕЕЅՍΥΧ
Let's use the "Ѕ" and create a fake "SVC_Siemens" user. For examples as domain administrator:

I think nobody will ever notice that this user is a different user than the real "SVC_Siemens" user. I would recommend to assign the fake user some rights (DCSync, GenericAll on domain admins, ..) instead of making the user directly a domain admin because this is a lot harder to detect by attackers. For example, the domain admins could be checked:

It looks like "SVC_Siemens" is in the domain admins group.

But if we list groups from the "SVC_Siemens" user the domain admins group is not there (because this is the other user). I think this can give an attacker some headache, but it's way more evil to configure rights (ForceChangePassword, GenericAll, ...) because they are more complex. In addition to that PowerView also displays sometimes the data wrong, e.g.: the output of "Get-NetUser SVC_Siemens" shows correctly the low privileged user, but for example the output of the next command merges the results of both users:

Let me finish with an explanation of why I would implement something like this: We could also just create a honeyuser with an uncrackable password and if someone tries to login trigger an alert. However, a successful login is a stronger indicator that a real attack happened and my main goal was to redirect the attacker into a rabbit hole to waste a lot of time. The blue team can use this time to analyze the incident and kick the attacker out of the network. If a login would not be possible the BloodHound paths would be very short (just one edge) and therefore an attacker would maybe take a different path to become domain administrator. However, if there is a long path in BloodHound and the attacker can easily follow the first edges and is then stuck in the last edge (a honeyuser protected with the described trick) with something which he knows is typically working, he will keep trying to get it working.
Other decoys
There are a lot of other possibilities to detect attackers. For example, I would also configure decoys to detect bloodhound usage (to detect session enumeration from the ingestor). I didn't test this but I assume that a fake machine account can be created with a "dnshostname" pointing to the honeyport to ensure that the ingestor triggers the honeyport. Another option could be to let the "homePath" of a honeyuser point to the honeyport, so if an attacker tries to enumerate shares he triggers the honeyport. And I would also add a SPN for a MSSQL server pointing to an honeyport to alert as soon as someone tries to enumerate and attack SQL servers.
Another decoy could be GPP passwords
with an OU linked to a honeypot service (the configured honeyport) or cleartext
credentials stored in a logon script. However, GPP passwords are an old attack
and are therefore maybe obvious for experienced attackers.
It’s also possible to store callback
documents on the file share. Some years ago this was possible with PDF files
(see BadPDF and WorsePDF),
however, this was then fixed by Adobe. This is still possible with docx files (this technique is from a tweet from PythonResponder, the author of Responder.py). Such
a word file can easily be created by opening the word file, pressing ctrl+f9,
writing
IMPORT "\\\\Honeyport-IP\\1.jpg"
Then right clicking it and selecting
“edit field” and ticking the “data not stored in the document”. As soon as the
document is opened it triggers a connection to the honeypot system (on which
the honeyport is running). Moreover, file system logging can be used to detect
when someone copies / reads the file on the share.
The decoy file can be named
“credentials.docx” which is stored in a hidden/deep location on the share and
triggers a NetNTLM authentication when it is opened. This would reveal the
compromised username together with the IP address. Finding such critical files
is often done with the PowerView function Find-InterestingDomainShareFile(). This
function queries for files with a name containing one of the following words:
- password
- sensitive
- admin
- login
- secret
- unattend*.xml
- *.vmdk
- Creds
- Credential
- .config
It’s therefore recommended to use
one of these words in the filename of the honey document.
Honey trap cyber security is a social engineering attack where a cybercriminal uses a fake online persona to lure a victim into revealing confidential information or performing actions that compromise their security. This type of attack is often used to target high-profile individuals or organizations, but it can also be used against anyone who is not careful.
AntwortenLöschen